Vintage patterns can be more difficult to work with just because of changes in terminology and tracking down duplicate yarn. And then you have to deal with the fact that some of them might have errors, but there’s no Errata to prove it. So, this page was born. I can only track patterns I use myself, but if you are also into vintage patterns and have found errors, please send them my way!
Patterns are arranged alphabetically by title. When possible, I have included a link for purchase. I do not make any money from this, but if you like the pattern enough to be on this page, seems like you may like to grab it for yourself. If you find a broken link, please let me know. Please remember, when buying vintage patterns, that any errors are NOT the fault of the seller, and they shouldn’t affect a seller’s rating.
930 30s Cardigan
Yarn Unknown
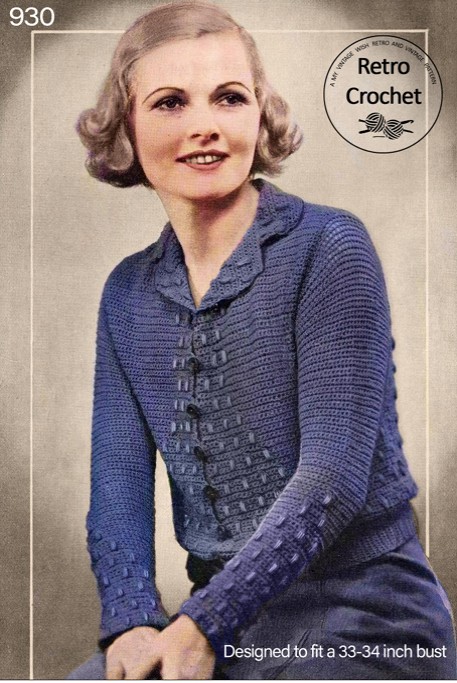
Button size: Calls for 3/4″ buttons, which seems large for the buttonholes; measure the buttonholes on the waistband for correct size.
After 70th row: Repeat from ** to ** twice more; the second ** is in the pattern, but the first ** is not in the pattern. Repeat from row 64.
Bed Jacket
Emu Yarn Pamphlet #2858
In Finishing Instructions, under Edging: …attach yarn to lower edge, then work 2 d.c. into each 2 ch. sp., 3 d.c. into corner…
CORRECTION: …attach yarn to lower edge, then work 2 d.c. into each 2 ch., 1 d.c. into center bottom of each V-stitch, sp., 3 d.c. into corner…
In Finishing Instructions, under Cuff: …then work 2 d.c. into each 2 ch. sp….
CORRECTION: …then work 2 d.c. into each 2 ch. sp., 1 d.c. into center bottom of each V-stitch…
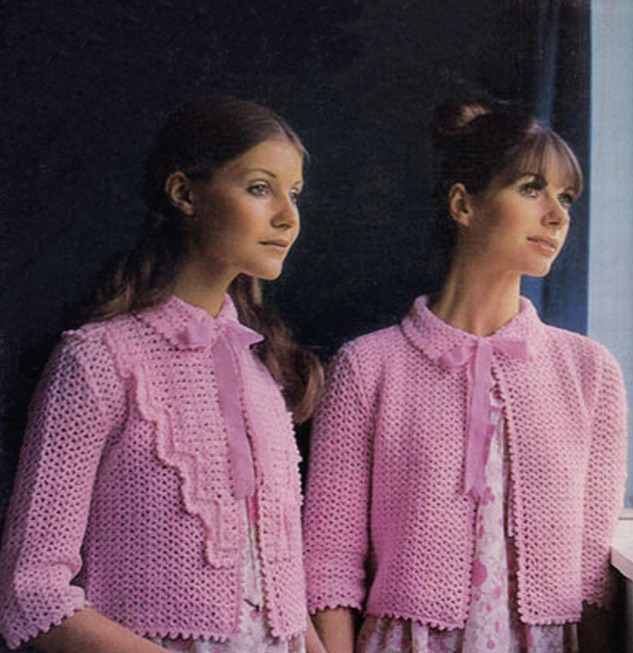
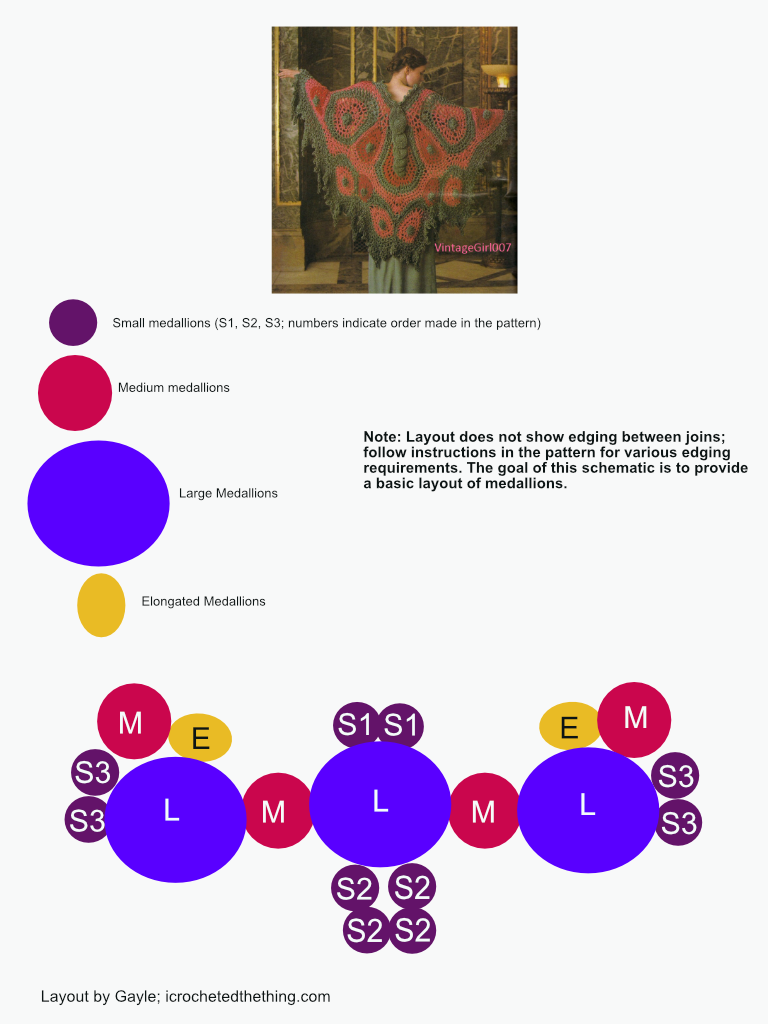
Butterfly Shawl
Lily’s Yarn (1970s)

Medium Medallions:
Row 5: …*1 sc in next st, sc in next st; repeat from *
Correction: …*1 sc in next st, 2 sc in next st; repeat from *
First edging section, Round 1: It says to complete 12 decs in Round 1. Should be 8 decreases.
First edging section, Round 2: Says to complete 14 decs in Round 2. Should be 10 decreases.
Last edging section, Round 2: …Work 2 hdc in first dc, (2 dc, ch 4, 2 dc) in next stitch, 2 dc in next stitch…
CORRECTION: …Work 2 dc into first dc, (2 dc, ch 4, 2 dc) in next stitch, 2 hdc in next stitch…
Last edging section, Round 2: In next 12 sts of dc…
Correction: In next 12 sets of dc…
Not errata, but the original pattern does not have a schematic, so I made a very basic one to help with any layout issues.
Crochet Belted Jacket
Knit & Crochet with Aunt Lydia’s Heavy Rug Yarn, Star Book No. 195 (1960s)
Near the end of the Right Front instructions: …Skip 5 (5) sl sts of back for neck, attach yarn in next sl st, then complete 3 pattern rows.
CORRECTION: You need to complete 4 pattern rows, not 3, in order for the seam on the left front to line up properly with the shoulder.
Left Front: The instructions do not tell you how to complete the mirrored decreases from the right side. Slip stitch into the stitches you are meant to skip. The final edging on the jacket will cover them.
Crochet Blouse (Twilley’s #5111)
Twilley’s Couture Crochet by Barbara Warner (1970s)
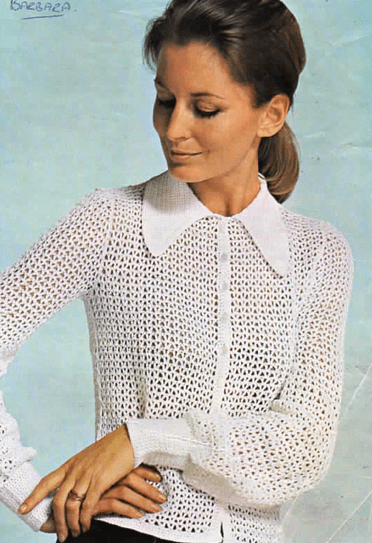
Sleeve, 5th row: 1 tr. over tr. *(1 tr. 1 ch. 1 tr.) into next 1 chp.sp. rep. over the next 6 1 ch. sp. 1 tr. into next 1 ch. sp. (1 tr. 1 ch. 1 tr.) into next 1 ch.sp., ending with 1 tr. over tr. and 1 tr. into st.ch. 3 ch. turn.
CORRECTION: 1 tr. over tr. *(1 tr. 1 ch. 1 tr.) into next 1 chp.sp. rep. over the next 6 1 ch. sp. 1 tr. into next 1 ch. sp. (1 tr. 1 ch. 1 tr.) in each 1 ch.sp. ending with 1 tr. over tr. and 1 tr. into st.ch. 3 ch. turn.
Crocheted Sweater (E-1087)
Needlework Bureau Mail Order (1940s)
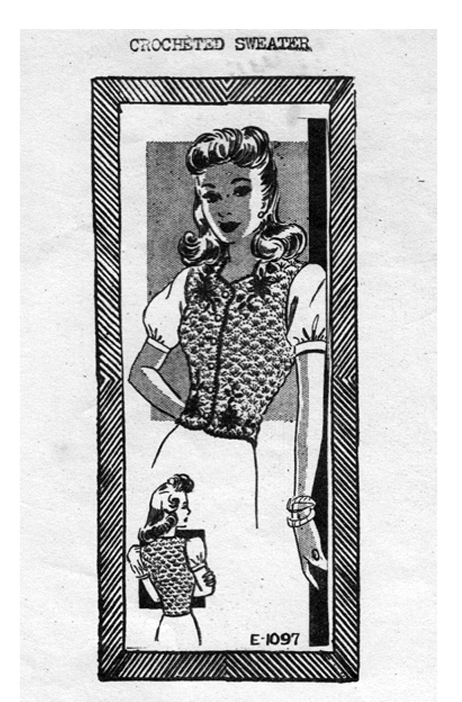
Decorations: Stitch buttons (to correspond to holes) on right center front.
CORRECTION: Buttons should be placed on left center front, as buttonholes are created on right.
Large Size Front Panel, both sides: Row 24: Ch 1, sl st 13 sts…
CORRECTION: Ch 1, sl st 16 stitches…
Large Size Front Panel, both sides: Row 41: …5 dc in next sc st, 1 sc over ch 1, 5 dc in next sc st, 1 sc over ch 4, tie off.
CORRECTION: 5 dc in next sc st, 1 sc over ch 4, tie off.
Back Shaping: When repeating pattern rows after Row 26, do continue to add slip stitches on odd-numbered rows. Instead, begin with a sc over the previous row Ch 4 as you did for the front panels.
Crocheted Evening Gown with Cape and Belt
Bernat Yarn Company (1930s)

2nd decrease row instructions in Skirt (used also for the cape): …Make 1 dc over the sc in decrease of last row, taking off first 2 loops only, 1 dc in next sc working off all loops.
CORRECTION: Work patterns to decreased pattern from last row. Complete 1/2 dc in first sc. Complete 1/2 dc in ch 1. Complete 1/2 dc in second sc. Pull through all loops. Ch 1. Continue pattern stitch in next stitch. Ch 1, continue 1 sc, ch 3, 1 sc around last sc.
Deep V-Neck Blouse
Chadwick’s Yarn Company (1950s)
Yarn: The top says you only need 8 ozs (227 grms) to complete the two largest sizes. This appears incorrect. I worked the second-largest size to gauge and came out short with 8.5 ozs. (241 grms) I suggest adding 2 ozs (57 grms) to the yarn recommendation.
Sleeves: You will need to make a second set of sleeves and attach to the front as you attached to the back.
Sleeve decrease at beginning of row: Skip the first two chains, the first cluster, and the first chain after the cluster. Complete first cluster for the row in the second chain.
Dress
Emu Yarn Pamphlet #2815 (1970s)

Bodice (Fingering (4-ply) weight):
Commence with 41 (42, 43) ch. to measure 8-1/4, (8-1/2, 8-3/4) inches
CORRECTION: Commence with 47 (48, 49) ch. to measure…
Bodice (DK weight):
Commence with 33 ch. to measure 8-1/4 inches
CORRECTION: Commence with 41 ch. to measure 8-1/4 inches.
Evening Jacket
Evening Ensemble #122 (1940s)
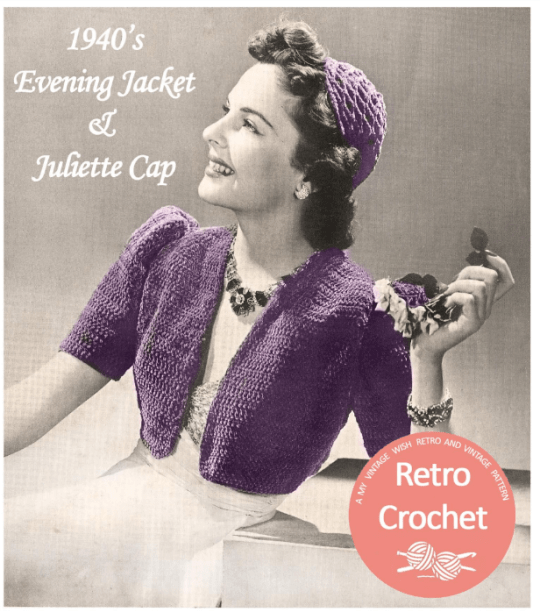
Right Sleeve, 2nd Row: …1 dc in each of next 25 stitches.
CORRECTION: Should be 24 stitches to match left sleeve.
“Over”: A few times a row starts with the instruction “Over.” You need to complete a yarn over.
Gala (No. 1180)
Morell Yarn Company (1950s)
Waist Instructions issue: Starting point of Skirt portion and Waist portion are meant to be worked from the same measurement, but the Waist instructions show a different number of loops for the same chain measurement. Use starting skirt sizing instructions to match sizing.
Pattern is available for free from my files.
Geometric Rug
Reynolds Yarn Company (1970s)
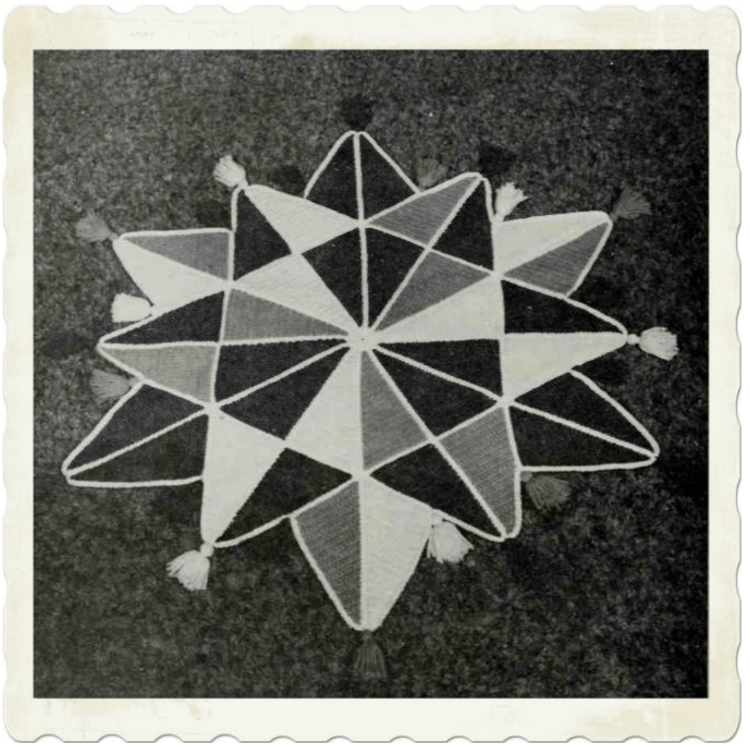
Border for first 18 triangles: The pattern instructions are not entirely clear. Work the short side, then up the straight side, and then work the angled side when you’re skipping stitches.
Border for second 18 triangles: Work short side, then the angled side with the skipped stitches, then finish on the straight side.
Hot Plus (Style 7130)
Phentex Yarns (1970s)
(Note: I have only made the hot pants part of this pattern and cannot confirm if there are errors in other parts of the pattern.)
For Hot Pants:
Row 2-3-4: Repeat row 2.
Correction: Row 2-3-4: Repeat row 1.
Next Rows: Rep row 17 to row 23 (24) making the dec underneath those of prec rnd.
Correction: Repeat row 17 to row 23 (24) making the dec over those of prev rnd.
Juliet Dress
Women’s Day (1969)
Neckline, Rnd 4: Ch 1, sc in joining, sc in each st, decreasing 10 dc sc evenly spaced along each shoulder edge. Join to first sc.
Note: Not a correction of any instructions, just clarification. The round has 20 decreases total. 10 are worked on the shoulder edge of the left shoulder, and the other 10 are worked on the shoulder edge of the right shoulder. The shoulder edge is the space between the previous decreases to shape the neckline.
Lacy Top
Robin Yarn Company (UK) 2283 (1970s)
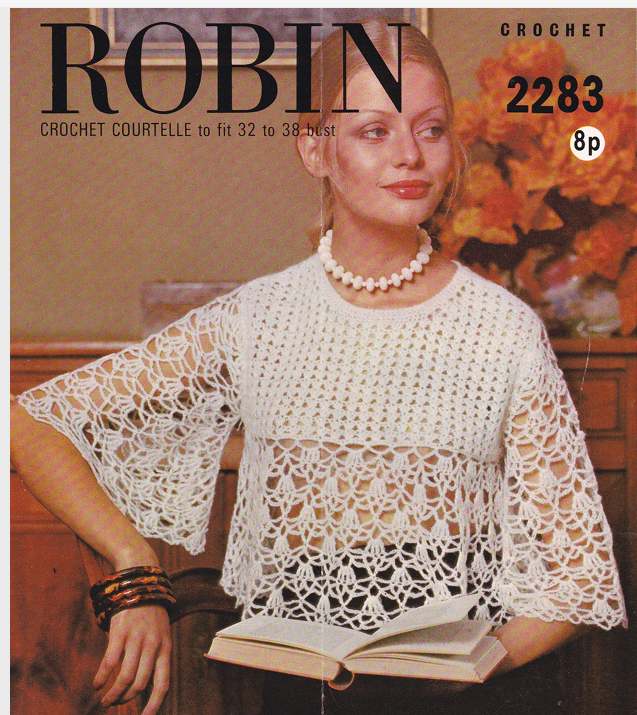
(Note: All of the noted errors in this pattern concern either the general pattern or the 34″ bust size ONLY. As I did not build the other bust sizes, I cannot say for certain if there are issues there. Hopefully, if you do find issue with the other sizes, these corrections can provide some help.)
Shape Armholes, first row:
Next row: Sl. st. over 2 (2) (3) (3) grps., 2 ch., 1 tr. in centre of next gr., patt. to last 4 grs., 1 tr. in next gr., 1 h.tr. in 1st tr. of next gr., 2 ch. turn.
CORRECTION: Only work slip stitch in the middle stitch of the group; do not work slip stitches across each stitch of group. It will throw off the final stitch numbers.
Shape armholes, third row:
Next row: Sl.st. into tr., 3 tr. in centre of next 3 tr.gr., patt. to last tr., 1 tr. in tr.: 23 (25) (25) (27) grs. remain, 3 ch. turn.
CORRECTION: Skip the decreased treble that ended the last row and complete the first slip stitch in the first, non-decreased treble.
Shape back neck, second row:
Next row: 3 tr. in centre of next gr., patt. to end. Work over 7 (7) (8) (8) grs., 2 tr. in centre of next gr., 1 tr. in turning ch., no ch. turn.
CORRECTION: “Work over 7 (7)…” is the start of a new row. Complete previous row with a Chain 3.
First shape shoulder section, first and second rows:
Next row: Sl.st. over 3 grs. into centre of next gr. work [1 d.c. 1 h.tr. 1tr.] work in patt. to end, fasten off.
Miss centre 5 (7) (7) (7) grs., rejoin yarn to centre of next gr., 2 ch., 1 tr. in same place, patt. to end.
CORRECTION: Row beginning “Miss centre 5…” should be labeled as shaping for second armhole.
First shape shoulder section, All sizes row:
All sizes: Patt. over 7 grs., 1 tr. in 2nd tr., 3 ch. turn.
Work straight on these 7 grs. to same number of rows as other side to shoulder ending at neck edge. 3 ch. turn.
CORRECTION: 1 tr. in 2nd tr. is incorrect if the shaping starts on an odd-numbered row. The armhole shaping can vary slightly due to the instructions for the front and back pieces being slightly different.
On the front and back, the shaping should end on rows facing the same direction due to joining the yarn on the inside edge as though you are continuing the row at the beginning of the shaping when you start the second armhole.
Second shape shoulder section, first row:
Next row: Patt. over 3 grs., into centre of next gr. work [1 tr. 1 h.tr. 1 d.c.] sl.st. into next tr., fasten off.
CORRECTION: Work to match the first shoulder shaping.
Back Bodice, first paragraph:
All sizes: ** 5 ch., miss 4 ch., 1 d.c. in next ch.; rep from ** (13) 918) (17) (21) times more.
CORRECTION: 13 should not be in (). Should work 16 more for 34″ chest.
Back Bodice, first paragraph:
1st, 2nd, and 3rd sizes only rep. from * to * 3 (2) (2) times.
CORRECTION: For 34″ chest, repeat only 1 time.
Front Yoke:
Shape front neck: Work as back neck from (star) but working same number of rows as back from beg. to shoulder before shaping shoulders.
CORRECTION: May need to reverse shoulder shaping instructions if the final row worked to meet the number of rows on the back yoke shaping ends with the front yoke on the insde of the neck shaping rather than the outer edge. In this case, work as follows on the final final yoke row: Work 3 groups, [1 tr. 1 h.tr., 1 d.c.] in next; slip stitch in middle of stitch troups and the top of chain 3. Fasten off.
Mr. And Mrs. Claus Pillows
Company and Publication Unknown (1980s)
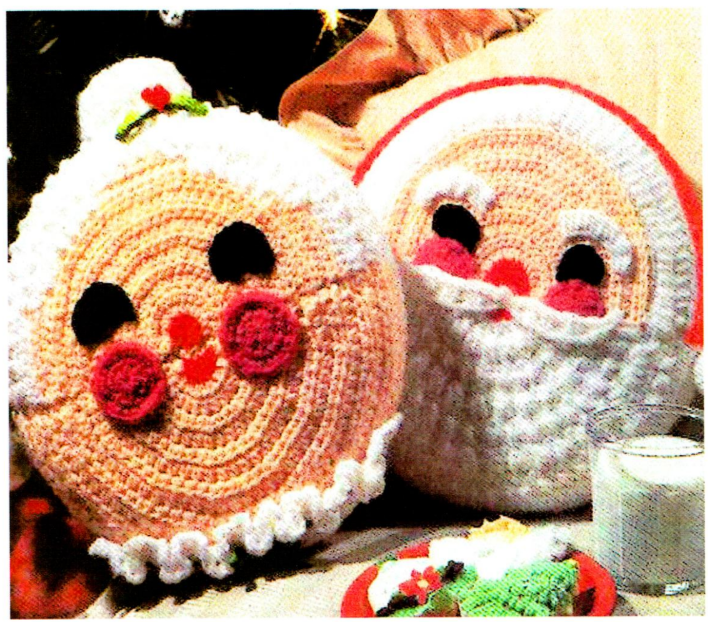
Yarn Information: Pattern says to use 4 ply (fingering weight) for correct look and gauge, you need to use 10 ply (worsted weight).
Ribbon Cloche
Star Hat & Bag Book #107 (1950s)
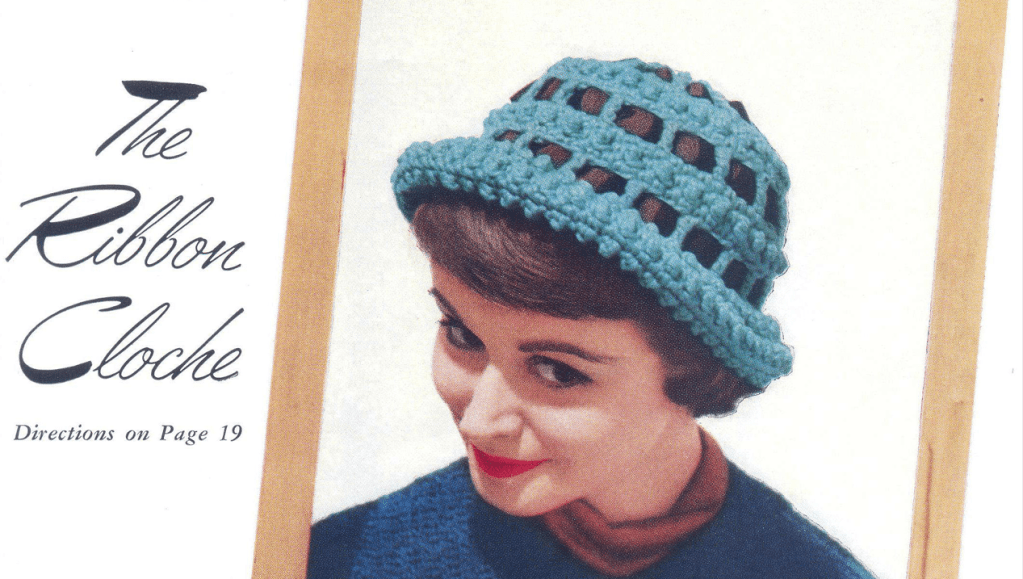
Calls for a size G hook. Hook size should be a 4.5mm (modern G hooks are usually either 4.0 or 4.25mm).
Round 12: It says to repeat Round 8. When I did, the brim didn’t have the same fullness it does here. I recommend repeating Round 4.
Round 21: It says to fold under the final row of the brim and sew it to the last row of beading. The hat has no beading. I folded under and sewed to the bottom of the final row of pattern stitches, as that seems like what they meant.
Style No. 1010-153
Bernat Leaflet (1960s)
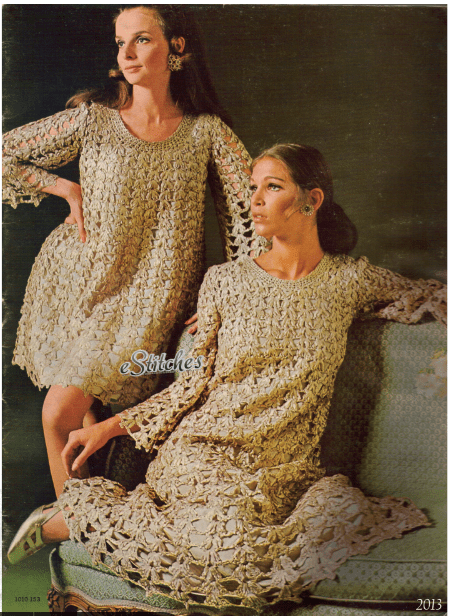
Left Shoulder: Ch 7. Repeat Row 1 of right shoulder. Mark end of row 2 for neck and work to correspond to right shoulder until Row 6 has been completed.
CORRECTION: Left Shoulder: Ch 7. Repeat Row 1 of right shoulder. Mark END of row 2 for neck edge. Repeat rows 2-6 of Right shoulder, reversing stitches so neck edge increases are lined up with the marked neck edge on Row 2.
Row 8: …then working across chain of right shoulder piece, *skip 2 stitches, 1 shell…
CORRECTION: Row 8: …Shell in first ch of Right Shoulder. *Skip 2 ch sts, 1 shell in next st, repeat from *…
SHAPE UNDERARMS: …work in shell pattern to end of row, attach a small piece of ribbon and ch 3, *skip 2 ch sts,1 shell in next stitch…
CORRECTION: SHAPE UNDERARMS: …Work in shell pattern to end of row; Complete 1 more shell in top of the turning chain. Ch 3. Turn.
CORRECTION (V2): …work in shell pattern to end of row. Drop working ribbon. Attach a new length of ribbon to the final stitch of the previous row and Ch 3. Fasten off new ribbon. Pick up working ribbon. Skip 2 ch sts, 1 shell in next stitch. Ch 3. Turn.
SLEEVES: …repeat from * once more…
CORRECTION: SLEEVES: Ch 12. Row 1: 1 dc in 6th from hook, 1 dc in same st, ch 1, 2 dc in same st, *skip 2 sts, 1 shell in next st, repeat from * once more, ch 3, turn. (asterisk in correct spot)
SLEEVES: …shape underarm same as back…
CORRECTION: SLEEVES: …shape underarms same as back (make certain to complete the ch 6 before starting the underarm pattern)
Tailored Jacket
Coats & Clark; 1980s
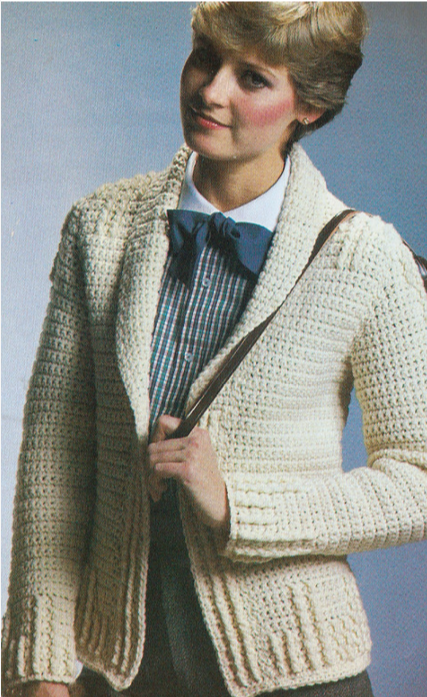
Left Armhole: You will need to work the raised stitches for the top of the left armhole from the back in order for them to be on the same side of the fabric as they are on the right armhole. All other raised stitches are worked from the front.
Wartime Doll
(Home Chat, 1942)
Note: This is a slightly odd errata. The pattern I have was typed up and reformatted by the person selling it, and there is no scan of the original pattern that I can find anywhere. If you have the original or a scan of the original, these errors may not be in your copy.
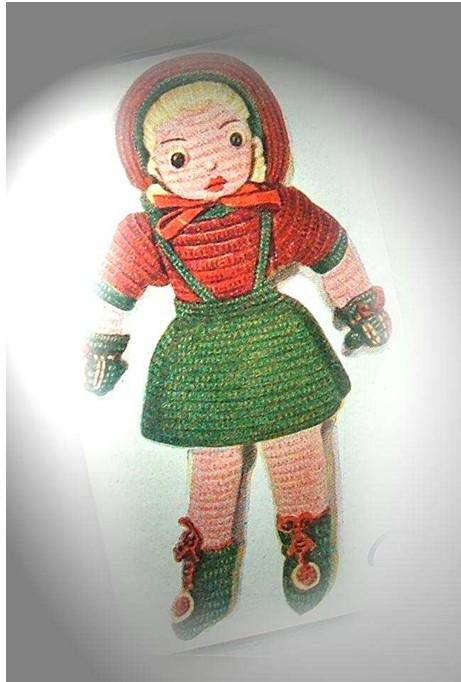
Yarn amount: Based on making it, I believe the doll requires 2 ounces of dark green, not 1.
Sleeves:
Error: NEXT RD: 2 tr. in each of the first 8 sts., 1 d.c. in each of the next 12 sts., 2 tr. in each of the remaining sts.
Correction: For proper sleeve shaping, work even.
Hat:
Error: NEXT 4 RDS: 1 tr. in each st. and inc. in every 10th st. Join on red wool.
Correction: There are two possible solutions: Either, increase on the first row, then work 3 rounds even, OR work even all 4 rounds. I haven’t made the doll again, so I haven’t gotten the chance to test it.
