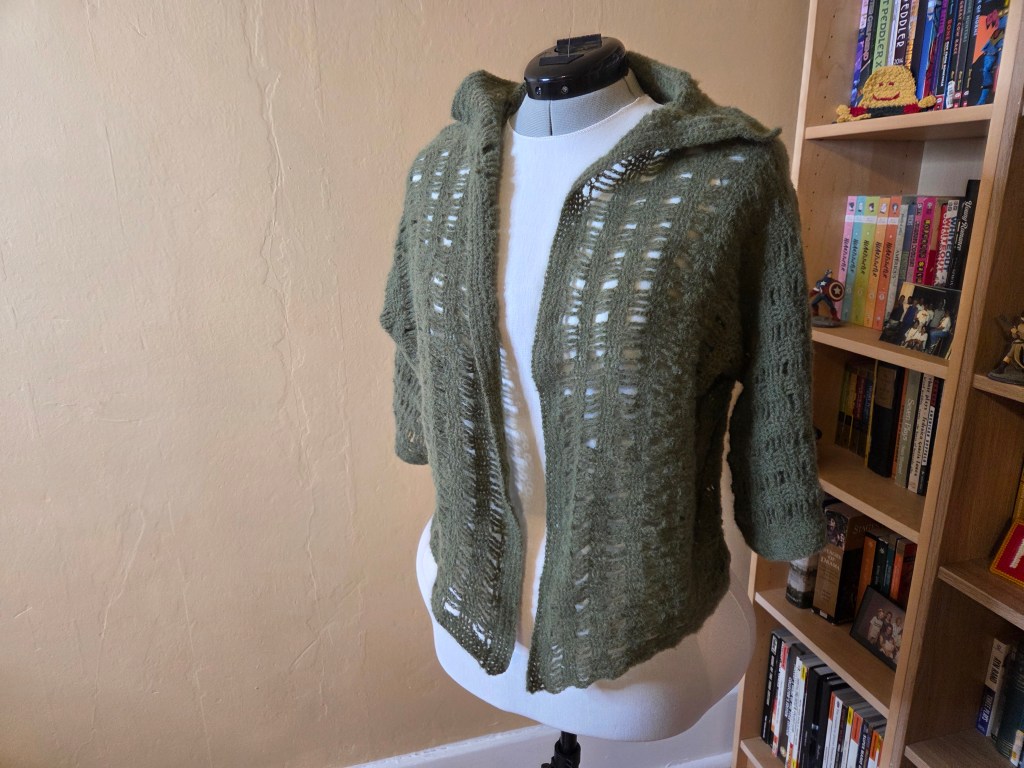
This pattern is recreated with minor updates from the copy found at Miss Julia’s Craft Connection. That blog has not been updated since 2018, so I have made the pattern available here for archiving and sharing purposes. My only changes are sizing notes and the schematic at the end. All other text is original to the pattern.

SIZE:
Small, 34”.
Larger sizes can be achieved by increasing yarn weight & needle size.
Size can also be adjusted by adding 8 stitches at a time to starting row; the row will work out to pattern this way, but you will need to adjust pattern repeat numbers throughout.
MATERIALS:
Original Yarn was a Light Fingering Weight:
Beehive Lady Betty Fleecy, 3 ply: 5 ozs or
Beryl Fine-spun Angora, ½ oz: 6 Skeins
1 Crochet Hook #13 [UK] / 2.25 mm [US]
If working with a larger yarn, choose a hook based on the recommendation on the yarn label and complete a gauge swatch based on gauge details below.
MEASUREMENTS in Light Fingering Weight:
Length from cop of shoulder – 19”
Width all round at under-arm – 34”.
Length of sleeve from underarm – 7”
GAUGE in Light Fingering Weight:
2 patts = 2 3/8”
3 rows SC = ½”
1 row DC = ½”
Work all chains loosely
If working with a larger yarn and hook, work a gauge swatch and measure accordingly.
SWEATER:
Start lower edge of Back, CH 113 loosely.
1ST ROW: Sk 2 CH, * 1 SC in 1 CH, rep from * to end of the row, turn.
2ND ROW: 2 CH, 111 SC on 111 SC, turn.
NEXT ROWS: Rep 2nd row 4 times.
7TH ROW: 4 CH, 1 DC on 1 SC, (4 CH, sk 4 SC, 4 DC on 4 SC) 13 times, 4 CH, sk 4 SC, 2 DC on 2 SC, turn.
8TH ROW: 2 CH, 1 SC on 1 DC, (4 CH, sk 4 CH, 4 SC on 4 DC) 13 times, 4 CH, sk 4 CH, 2 SC on 2 DC, turn.
9TH ROW: 2 CH, 1 SC on 1 SC, (4 CH, sk 4 CH, 4 SC on 4 SC) 13 times, 3 CH, sk 4 CH, 2 SC on 2 SC, turn.
10TH ROW: Rep 9th row.
11TH ROW: 4 CH, 1 DC on 1 SC, (4 CH, sk 4 CH, 4 DC on 4 SC) 13 times, 4 CH, sk 4 CH, 2 DC on 2 SC, turn.
NEXT ROWS: Rep from 8th to 11th rows 9 times, then 8th & 9th rows once. Fasten off, turn.
SLEEVE:
CH 42 for sleeve, & cont along next row of back, work 2 SC on 2 SC, (4 CH, sk 4 CH, 4 SC on 4 SC) 13 times, 4 CH, sk 4 CH, 2 SC on 2 SC, 44 CH (sleeve), turn.
CONT AS FOLLOWS:
1ST ROW: 1 DC into 4th CH from hk, 2 DC in 2 CH, (4 CH, sk 4 CH, 4 DC in 4 CH) 4 times, 4 CH, sk 4 CH, 2 DC in 2 CH, 2 DC on 2 SC, (4 CH, sk 4 CH, 4 DC on 4 SC) 13 times, 4 CH, sk 4 CH, 2 DC on 2 SC, 2 DC in 2 CH, (4 CH, sk 4 CH; 4 DC in 4 CH) 5 times, turn.
2ND ROW: 2 CH, 3 SC on 3 DC, 4 CH, sk 4 CH, 4 SC on 4 DC, rep from * to end of row, turn.
3RD & 4TH ROWS: 2 CH, 3 SC on 3 SC, * 4 CH, sk 4 CH, 4 SC on 4 SC, rep from * to end of row, turn.
5TH ROW: 4 CH, 3 DC on 3 SC, * 4 CH, sk 4 CH, 4 DC on 4 SC, rep from * to end of row, turn.
NEXT ROWS: Rep 2nd to 5th rows 8 times, then 2nd & 3rd rows once.
CONT AS FOLLOWS (This is the start of the neck opening. You may need to adjust your repeats if you have added extra stitches to get a better fit):
1ST ROW: 2 CH, 3 SC on 3 SC, 4 CH, sk 4 CH, 4 SC on 4 SC, rep from * 9 times, turn.
2ND ROW: 4 CH, 3 DC on 3 SC, * 4 CH, sk 4 CH, 4 DC on 4 SC, rep from * 9 times, turn.
3RD ROW: 2 CH, 3 SC on 3 DC, * 4 CH, sk 4 CH, 4 SC on 4 DC, rep from * 9 times, turn.
4TH ROW: 2 CH, 3 SC on 3 SC, * 4 CH, sk 4 CH, 4 SC on 4 SC, rep from * 9 times, turn.
5TH ROW: 2 CH, 3 SC on 3 SC, * 4 CH, sk 4 CH, 4 SC on 4 SC, rep from * 9 times, 16 CH, turn.
6TH ROW: 1 DC into 4th CH from hk, 4 CH, sk 4 CH, 4 DC in 4 CH, * 4 CH, sk 4 CH, 4 DC on 4 SC, rep from * 10 times, turn.
7TH ROW: 2 CH, 3 SC on 3 DC, * 4 CH, sk 4 CH, 4 SC on 4 DC, rep from * 10 times, 4 CH, sk 4 CH, 2 SC on 2 DC, turn.
8TH ROW: 2 CH, 1 SC on 1 SC, * 4 CH, sk 4CH, 4 SC on 4 SC, rep from * 11 times, turn.
9TH ROW: 2 CH, 3 SC on 3 SC, * 4 CH, sk 4 CH, 4 SC on 4 SC, rep from * 10 times, 4 CH, sk 4 CH, 2 SC on 2 SC, turn.
10TH ROW: 4 CH, 1 DC on 1 SC, * 4 CH, sk 4 CH, 4 DC on 4 SC, rep from * 11 times, turn.
NEXT ROWS: Rep from 7th to 10th rows 7 times. Fasten off, turn.
CONT AS FOLLOWS (this is the other side of the neck; adjust repeats based off any adjustments you made in the previous section):
1ST ROW: Sk 5 sp & 2 DC, join wool in next DC, 2 CH, 1 SC on 1 DC, * 4 CH, sk 4 CH, 4 SC on 4 DC, rep from * 5 times, 4 CH, sk 4 CH, 2 SC on 2 DC, turn.
2ND & 3RD ROWS: 2 CH, 1 SC on 1 SC, * 4 CH, sk 4 CH, 4 SC on 4 SC, rep from * 5 times, 4 CH, sk 4 CH, 2 SC on 2 SC, turn.
4TH ROW: 4 CH, 1 DC on 1 SC, * 4 CH, sk 4 CH, 4 DC on 4 SC, rep from * 5 times, 4 CH, sk 4 CH, 2 DC on 2 SC, turn.
5TH ROW: 2 CH, 1 SC on 1 DC, * 4 CH, sk 4 CH, 4 SC on 4 DC, rep from * 5 times, 4 CH, sk 4 CH, 2 SC on 2 DC, turn.
6TH ROW: 2 CH, 1 SC on 1 SC, * 4 CH, sk 4 CH, 4 SC on 4 SC, rep from * 5 times, 4 CH, sk 4 CH, 2 SC on 2 SC, turn.
7TH ROW: 2 CH, 1 SC on 1 SC, * 4 CH, sk 4 CH, 4 SC on 4 SC, rep from * 5 times, 4 CH, sk 4 CH, 2 SC on 2 SC, turn.
NEXT ROWS: Rep 4th to 7th rows 9 times, then 4th row once.
45TH ROW: 2 CH, 1 SC on 1 DC, (4 SC on 4 CH, 4 SC on 4 DC) 6 times, 4 SC on 4 CH, 2 SC on 2 DC, turn.
46TH ROW: 2 CH, * 1 SC on 1 SC, rep from * to end of row, turn.
NEXT ROWS: Rep 46th row 4 times. Fasten off.
CONT AS FOLLOWS:
Start again at back of neck, sk 3 groups of SC, join wool on 1st SC of 4th group, & work as follows: 2 CH, 3 SC on 3 SC, * 4 CH, sk 4 CH, 4 SC on 4 SC, rep from * 9 times, turn.
CONT AS FOLLOWS:
1ST ROW: 4 CH, 3 DC on 3 SC, * 4 CH, sk 4 CH, 4 DC on 4 SC, rep from * 9 times, turn.
2ND ROW: 2 CH, 3 SC on 3 DC, * 4 CH, sk 4 CH, 4 SC on 4 DC rep from * 9 times, turn.
3RD ROW: 2 CH, 3 SC on 3 SC, * 4 CH, sk 4 CH, 4 SC on 4 SC, rep from * 9 times. Fasten off, turn.
NEXT ROW: CH 14 for neck & cont along next row, 4 SC on 4 SC, * 4 CH, sk 4 CH, 4 SC on 4 SC, rep from * 9 times, turn.
CONT AS FOLLOWS:
1ST ROW: 4 CH, 3 DC on 3 SC, * 4 CH, sk 4 CH, 4 DC on 4 SC, rep from * 9 times, 4 CH, sk 4 CH, 4 DC in 4 CH, 4 CH, sk 4 CH, 2 DC in 2 CH, turn.
2ND ROW: 2 CH, 1 SC on 1 DC, * 4 CH, sk 4 CH, 4 SC on 4 DC, rep from * 11 times, turn.
3RD ROW: 2 CH, 3 SC on 3 SC, * 4 CH, sk 4 CH, 4 SC on 4 SC, rep from * 10 times, 4 CH, sk 4 CH, 2 SC on 2 SC, turn.
4TH ROW: 2 CH, 1 SC on 1 SC, * 4 CH, sk 4 CH, 4 SC on 4 SC, rep from * 11 times, turn.
5TH ROW: 4 CH, 3 DC on 3 SC, * 4 CH, sk 4 CH, 4 DC on 4 SC, rep from * 10 times, 4 CH, sk 4 CH, 2 DC on 2 SC, turn.
NEXT ROWS: Rep 2nd to 5th rows 7 times.
34TH ROW: 2 CH, 1 SC on 1 DC, * 4 CH, sk 4 CH, 4 SC on 4 DC, rep from * 5 times, 4 CH, sk 4 CH, 2 SC on 2 DC, turn.
35TH & 36TH ROWS: 2 CH, 1 SC on 1 SC, * 4 CH, sk 4 CH, 4 SC on 4 SC, rep from * 5 times, 4 CH, sk 4 CH, 2 SC on 2 SC, turn.
37TH ROW: 4 CH, 1 DC on 1 SC, * 4 CH, sk 4 CH, 4 DC on 4 SC, rep from * 5 times, 4 CH, sk 4 CH, 2 DC on 2 SC, turn.
38TH ROW: 2 CH, 1 SC on 1 DC, * 4 CH, sk 4 CH, 4 SC on 4 DC, rep from * 5 times, 4 CH, sk 4 CH, 2 SC on 2 DC, turn.
39TH ROW: 2 CH, 1 SC on 1 SC, * 4 CH, sk 4 CH, 4 SC on 4 SC rep from * 5 times, 4 CH, sk 4 CH, 2 SC on 2 SC, turn.
40TH ROW: 2 CH, 1 SC on 1 SC, * 4 CH, sk 4 CH, 4 SC on 4 SC, rep from * 5 times, 4 CH, sk 4 CH, 2 SC on 2 SC, turn.
NEXT ROWS: Rep 37th to 40th rows 9 times, then 37th row once.
78TH ROW: 2 CH, 1 SC on 1 DC, * 4 SC in 4 CH, 4 SC on 4 DC, rep from * 5 times, 4 SC in 4 CH, 2 SC on 2 DC, turn.
79TH ROW: 2 CH, * 1 SC on 1 SC, rep from * to end of row, turn.
NEXT ROWS: Rep 79th row 4 times. Fasten off.
COLLAR:
Start at neck edge with right side of work facing, join wool & cont as follows:
1ST ROW: 2 CH, 1 SC on 1 DC, 4 CH, sk 4 CH, 4 SC on 4 DC, 4 CH, sk 4 CH, 4 SC alongside of 4 rows of SC, 4 CH, sk 1 DC, (4 SC in 4 CH, 4 SC on 4 SC) 3 times, 4 SC in 4 CH, 4 CH, sk 1 DC, 4 SC alongside of 4 SC, 4 CH, sk 4 CH, 4 SC on 4 DC, 4 CH, sk 4 CH, 2 SC on 2 DC, turn.
2ND & 3RD ROWS: 2 CH, 1 SC on 1 SC, (4 CH, sk 4 CH, 4 SC on 4 SC) 3 times, 20 SC on 20 SC, (4 SC on 4 SC, 4 CH, sk 4 CH) 3 times, 2 SC on 2 SC, turn.
4TH ROW: 4 CH, 1 DC on 1 SC, (4 CH, sk 4 CH, 4 DC on 4 SC) 3 times, (4 CH, sk 4 SC, 4 DC on 4 SC) 3 times, (4 CH, sk 4 CH, 4 DC on 4 SC) twice, 4 CH, sk 4 CH, 2 DC on 2 SC, turn.
5TH ROW: 2 CH, 1 SC on 1 DC, (4 CH, sk 4 CH, 4 SC on 4 DC) 8 times, 4 CH, sk 4 CH, 2 SC on 2 DC, turn.
6TH & 7TH ROWS: 2 CH, 1 SC on 1 SC, (4 CH, sk 4 CH, 4 SC on 4 SC) 8 times, 4 CH, sk 4 CH, 2 SC on 2 SC, turn.
8TH ROW: 4 CH, 1 DC on 1 SC, (4 CH, sk 4 CH, 4 DC on 4 SC) 8 times, 4 CH, sk 4 CH, 2 DC on 2 SC, turn.
NEXT ROWS: Rep 5th to 8th rows twice. Fasten off.
BORDER: With right side of work facing, & start at bottom corner of Right Front, work 6 rows of SC evenly round fronts & collar, work 3 SC into each corner st. Fasten off.
Start with wrong side of work facing, work 6 rows of SC evenly along lower edge of each sleeve. Fasten off.
FINISHING:
With damp cloth & hot iron, press lightly.
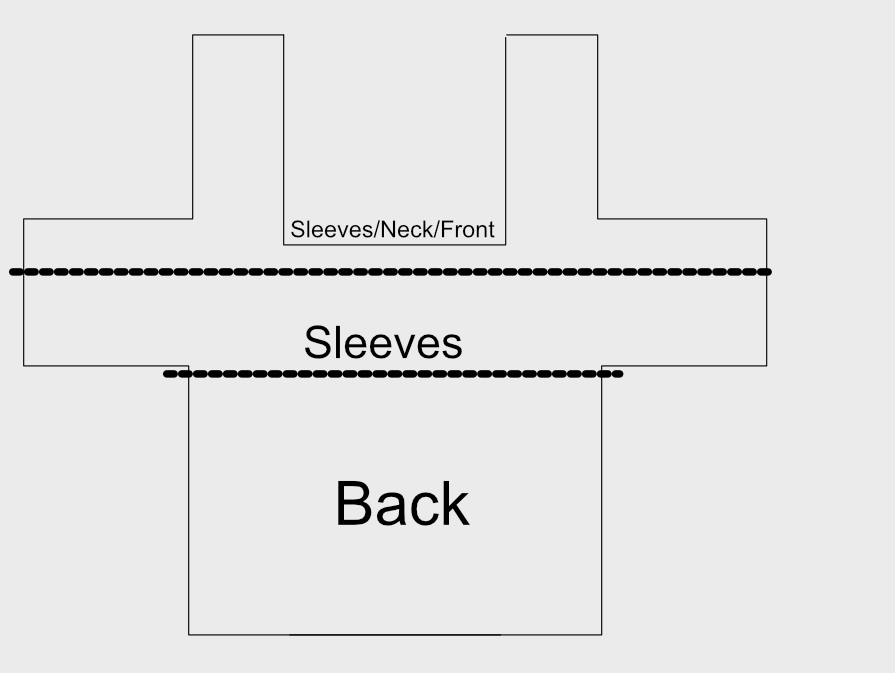
Schematic is not to scale.


