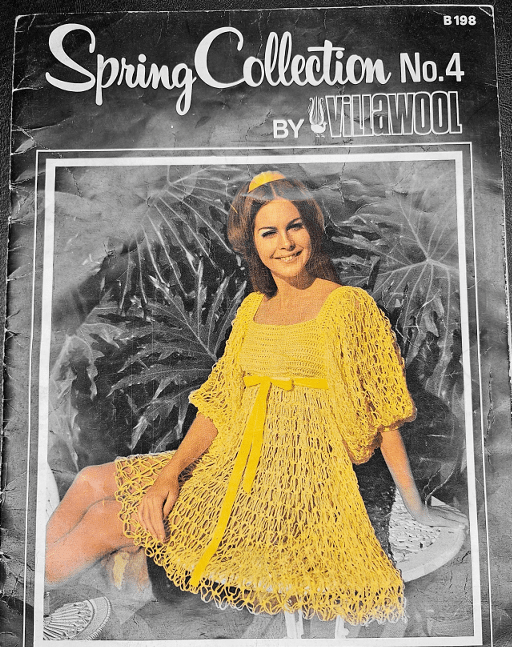
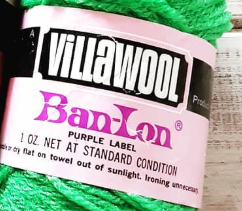
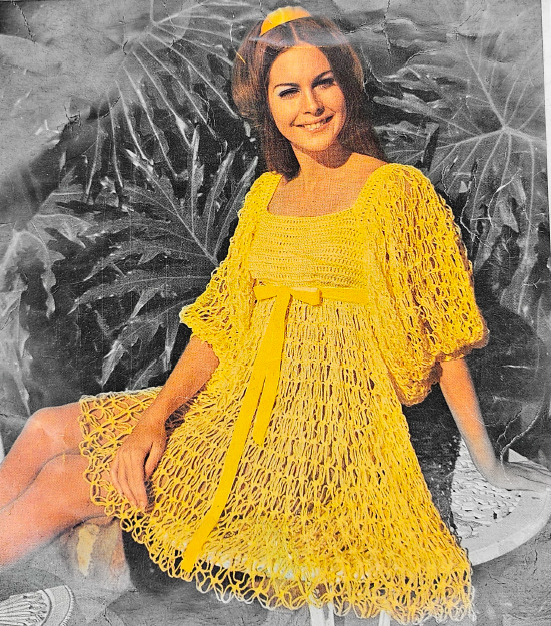
Villawool was an Australian yarn company that put out a yarn called Ban-Lon in the 1970s. Ban-Long was a 100% nylon yarn in 1 ounce balls in DK weight (8 ply). This booklet notes you want the “purple label” Ban-Lon, and my best guess about why the purple label was important is that it may have signified which Villawool yarns were nylon. Nylon yarns were a pretty new thing at the time, so I can see a company wanting to make them stand out.
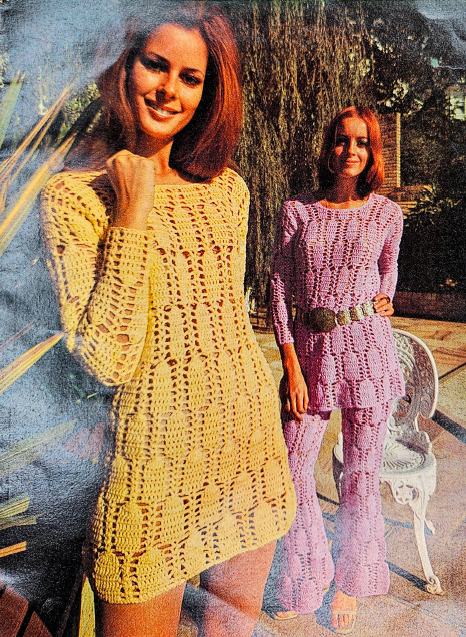
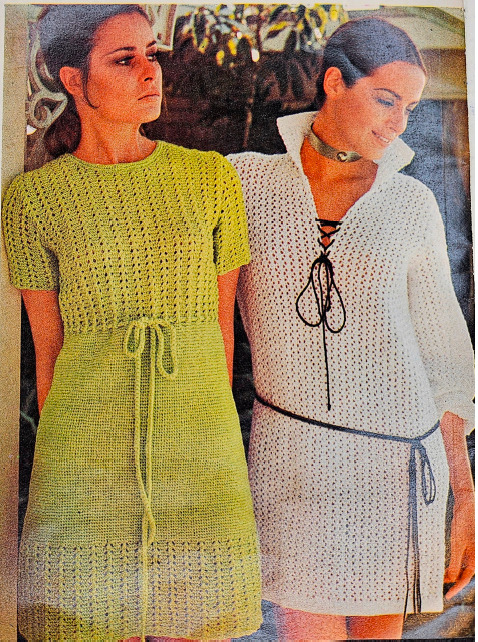
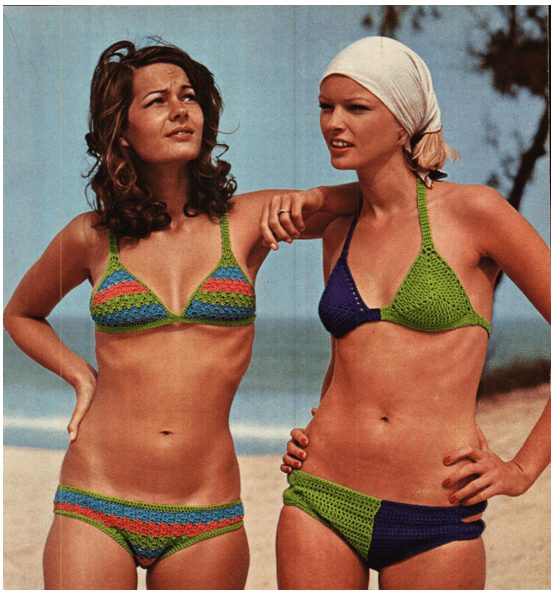
Anyway, this booklet includes 9 crochet patterns and 3 knitting patterns. Two of the crochet patterns are bikinis, and the photographer absolutely failed to get any full shots of them. The first one you can mostly see. The second one you can only see the straps under the poncho.
Identified Spinnerin Sparkle Twist as a sportweight.
Corrected a mistake: J&P Knit Cro-Sheen is size #10, not size #5 thread. Not sure where I got the #5 information. Reviewing my usual places, it wasn’t listed that way.
I’m hoping to find some time to do a full review of the entire list sometime in 2025 just to see if there’s further information I could fill in on some of the blank spots.
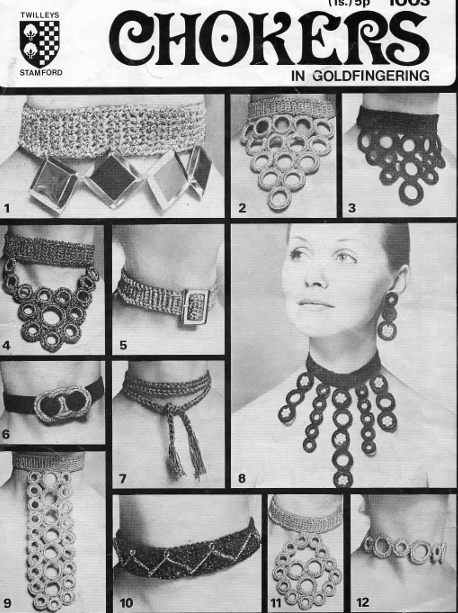
Courtesy of Twilley’s, a British yarn company, all of these chokers are built in similar fashion with the fun being in the different details. Some chokers call for curtain rings, which you can find at a sewing store on or Amazon. British crochet terms used, fingering weight yarn required.
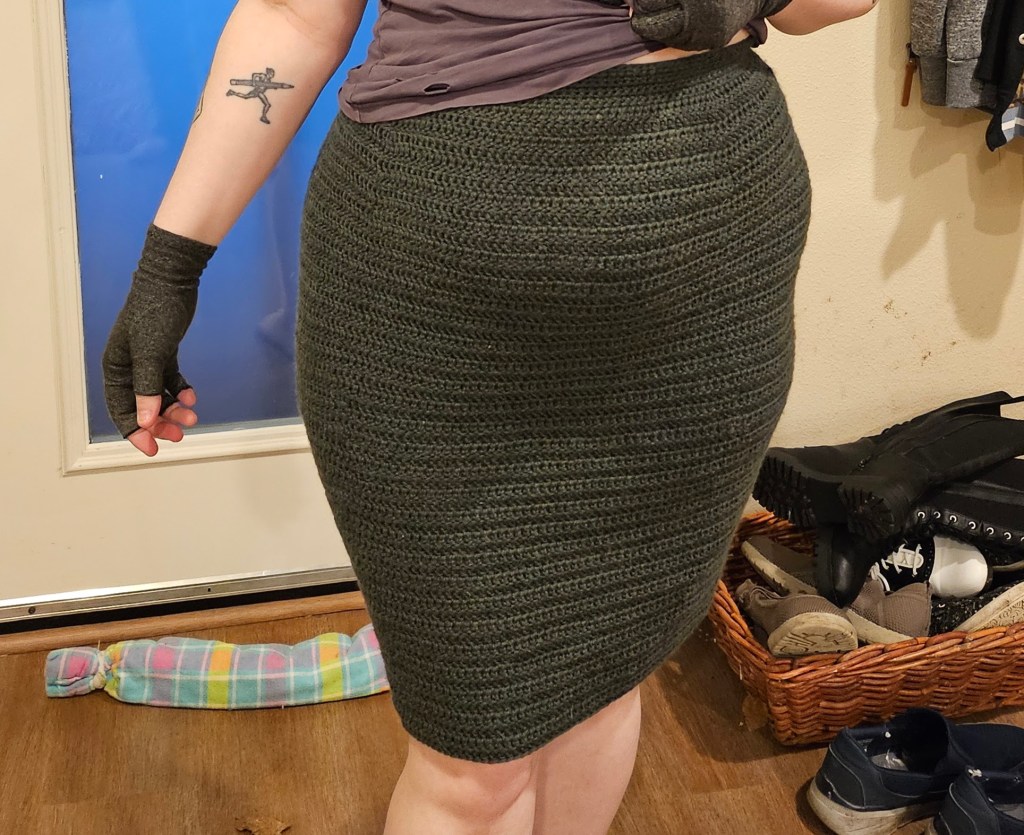
Years ago, I made a video tutorial for making a pencil skirt. It ended up on the front page of ravelry, which was fucking wild.
Anyway, time has passed, I’ve kept making pencil skirts, and now I’m here with what we’ll call Tutorial 2.0. Let’s get to it:
Supplies:
Yarn
Hook
Clear Elastic Cord or woven belting
Buttons or Zipper
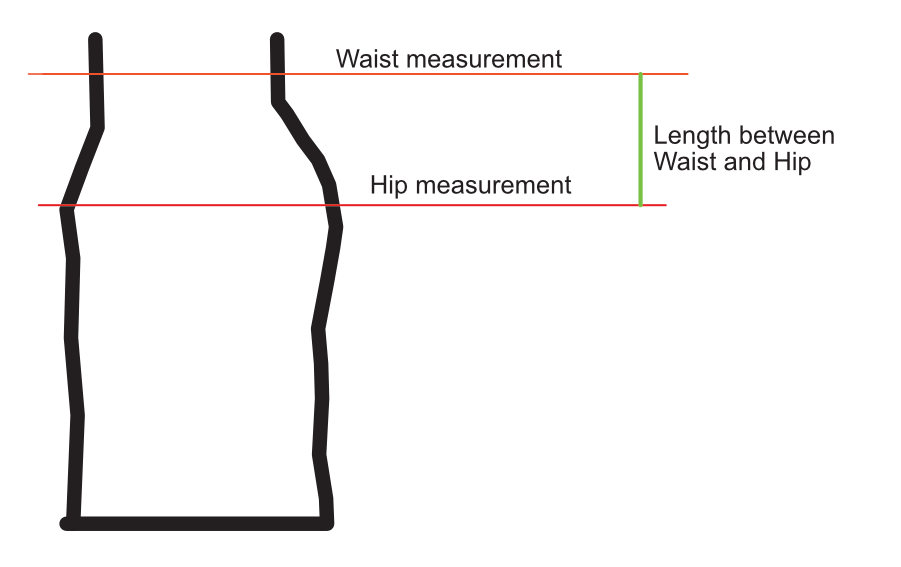
Step 1: Measuring
Measure the following things:
Your waist
The widest part of your hips
The length between your waist and the widest part of your hips
Measurements needed for pencil skirt
For example measurements, I will use my own:
Waist: 33”
Hips: 43”
Length between: 8”
Step 2: Gauge Swatch
A gauge swatch will help you accurately size your skirt. Work a gauge swatch of ten stitches across and ten rows. You can use any stitch you want for your skirt, but I tend to use single crochet for the waistband and double crochet for the body of the skirt. When I do a gauge swatch, I work it in double crochet since that is what I use for the skirt body.
Write down your number of stitches per inch, and the number of rows per inch.
For our example, let’s say I get 4 stitches per inch and 2 rows per inch.
Step 3: Make the Waistband
Crochet a chain to the same length as your waist measurement. Work in single crochet rows until the waistband is 1 inch tall. You can work clear elastic cord on the wrong side of the rows to add some stretch to your waistband. You can also work the waistband without elastic and use belting at the end to help hold the skirt in place. I have an example of belting in this video.
Step 4: Start the Body of the Skirt
Once you have the waistband 1-inch tall, you can start the body of the skirt by completing a row in pattern stitch. Once you’ve done that, wrap the waistband where you want it to sit, with the open ends at the back.
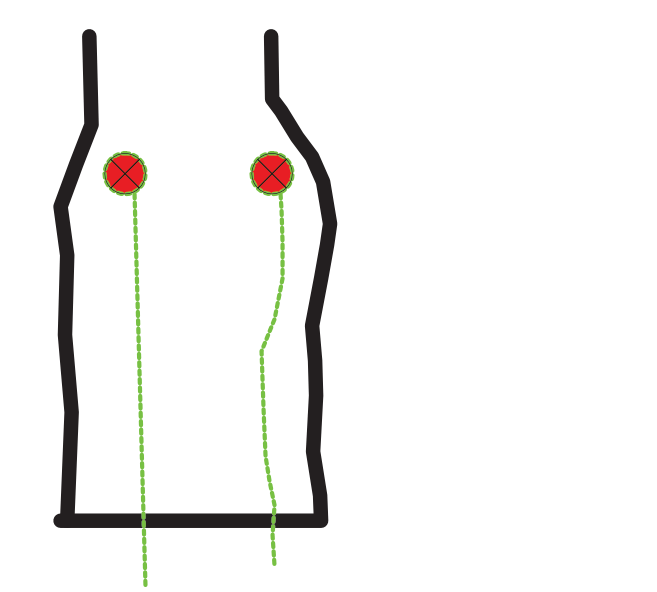
Step 5: Add Increases
This pencil skirt uses raglan increases. There will be four points on the skirt where you will always increase. You will work 3 stitches into each increase, always placing the next increase in the second stitch of a previous increase.
These increases should shape close to your body to give you the classic pencil skirt fit. For best results, place increases in the same places on either side of the skirt. Line them up with the front curve and back curve of your leg.
Increase location (green outline indicates leg)
I find it easiest to mark one side of the skirt, then simply count over from the other end the same number of stitches for both increases on the other side.
Step 6: Let’s Math it Up!
To make sure your skirt’s gonna curve correctly, you need to be sure you can hit the last round of increases you need within the length you have between your waist and your hips. As I mentioned earlier, my waist is 33” and my hips are 43” with an 8” length between. I get 2 rows per inch and 4 stitches per inch.
First, I need to know how many stitches I will need to add to my starting count:
33 (waist measurement) x 4 (stitches per inch) = 132 stitches
43 (hip measurement) x 4 (stitches per inch) = 172 stitches
172 – 132 = 40 stitches
Second, I need to figure out how many sets of increases I need to do to add those 40 stitches. On every row I increase, I add 8 stitches.
40 / 8 = 5 rows of increases.
Third, I need figure out how many rows I have to work to reach the full 8 inches between my waist and the widest part of my hips. I know my waistband is 1 inch. I know the one row of pattern stitch I’ve completed for the skirt body is ½”.
8 inches (total length between waist and hips) – 1-½” (amount of skirt already worked) = 6-½” to work.
I get 2 rows per inch.
2 x 6 = 12 rows
And then 1 more row for the other ½”. So, that’s 13 rows I need to work, but I only need 5 rows of increases. This means that I can work increase rows, then work a row or two even. This will keep the curve of the skirt smooth. The increase pattern may look like this:
Row 2 of skirt body: Increase
Row 3: work even
Row 4: work even
Row 5: Increase
Row 6: work even
Row 7: Increase
Row 8: work even
Row 9: work even
Row 10: Increase
Row 11: work even
Row 12: Increase
Row 13: work even
I do recommend working one row even between each increase row. That is 100% a personal preference.
Step 7: Join and Work in Rounds!
After you’ve completed the final increase round, you can join to the first stitch of the row and work in rounds for the rest of the skirt. This will let you try it on as you add length, so you can see how it’s building. When it’s the final length you want, fasten off.
Step 8: Waist and Fastenings
If you carried elastic cord on the back of the waistband when you worked the waistband, you can either add a zipper or buttons, depending on what you’d prefer. I like zippers just because I’m bad at buttonholes.
If you did not carry elastic, you can either sew in a strip, or you can use belting to create a stronger waistband that will keep its shape over time. If you choose to use a zipper with the belting, I recommend putting the belting in first because then it can act as extra support for the top of the zipper.
Once you’ve finished off that way, you’re good to go. I bet you look great!
Final Notes:
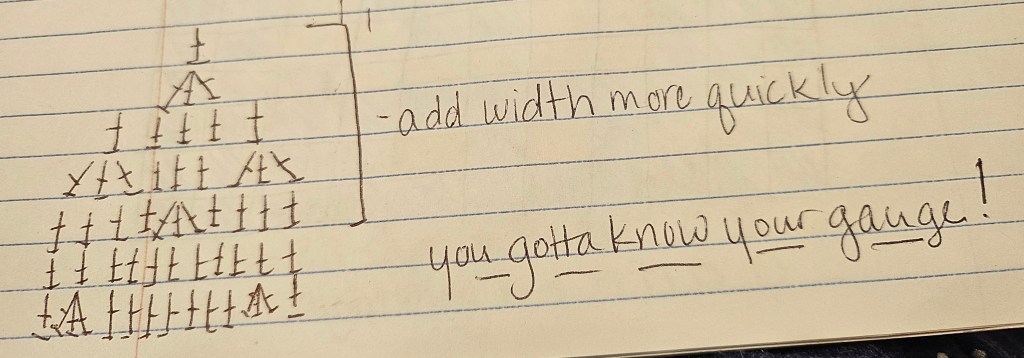
If you need more than 8 increases per increase row to get your skirt the right hip measurement at the correct point in your hip, you can add more increases. Here’s an example:
Extra increases can be added on alternate rows
If you want a pencil skirt that is a big snugger in the butt, work an inch without increases, then complete decreases in the same spots you had previously been increasing (You’ll decrease over 3 stitches for each decrease to match your increase count). Work a row or two even, try on, and then decrease again if you want to. Repeat as much as you’d like to get a very close fit.
If you keep working increases, you’ll get an A-line skirt. You can still join at the end of the final increase you need to hit your hip width and work in rounds after that.
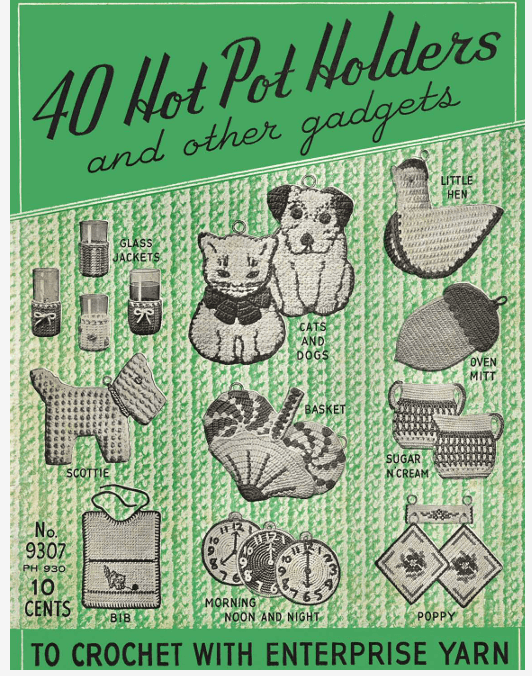
Look at her. She’s beautiful. What a bawking boss.
It’s from this book from Enterprise Yarn (Now Lily’s Sugar & Cream), from the 1940s:
As it required with these adorable pattern collections, there is one terrifying monstrosity. It’s a corn man. You’ll know it when you see it.
Quick Tip: The book says you should use a 2mm hook for all projects unless told otherwise. This will make your fingers fall off. You’re working with worsted weight. Go up to a 3.5. You’ll get a tight gauge, the items will only be about an inch larger than specified, and you’ll be able to feel your wrists when you’re done.
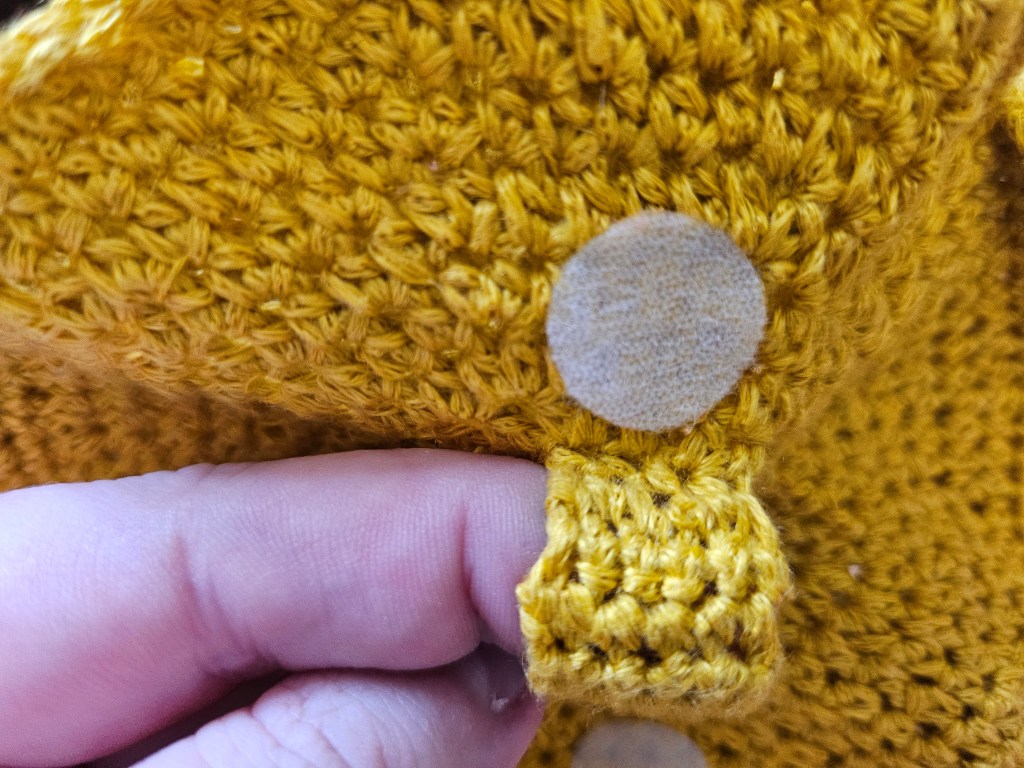
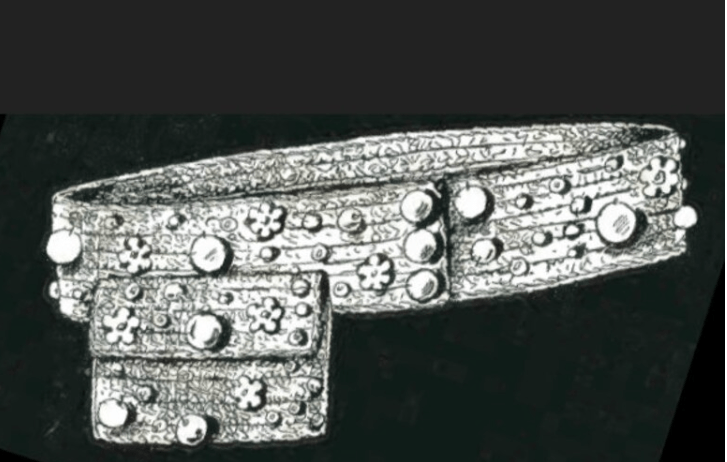
You can make a belt bag in any yarn weight and any stitch pattern, really. It’s a very versatile sort of project. Just remember that however thick the belt is, you’ll have to double that when you fold over the end and sew it down to attach it to the belt buckle. In heavier yarns, that fold over could be pretty uncomfortable.
Here’s the one I made freehand (And here’s a video about it). The bag part is 2 circles that I stitched together, but you can make any sort of shape. There’s some tips near the end of the post about how to make the bag part.
Supplies:
Yarn and hook
Belt buckle
Grosgrain ribbon
Sewing supplies to attach ribbon
Anyway, let’s get to stitching! We’ll start with the belt:
Step 1: Make a chain that matches your waist measurement + 5 inches. So, if you have a 40-inch waist, you want a 45-inch chain. If you are working with a stitch pattern that requires an exact repeat of chains to start, don’t worry if you’re a little over the 5 inches.
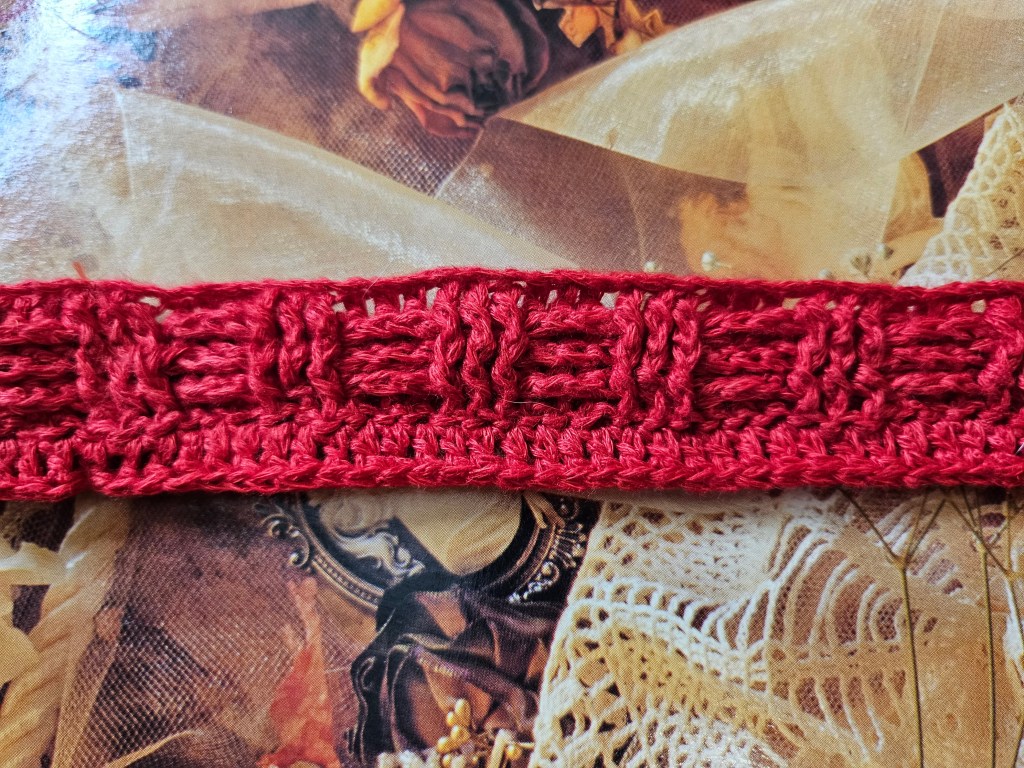
Step 2: Work your stitch pattern until your belt measures 1-inch tall, then fasten off. I used a basketweave stitch with fingering weight yarn and a 2.75mm hook. It took five rows.
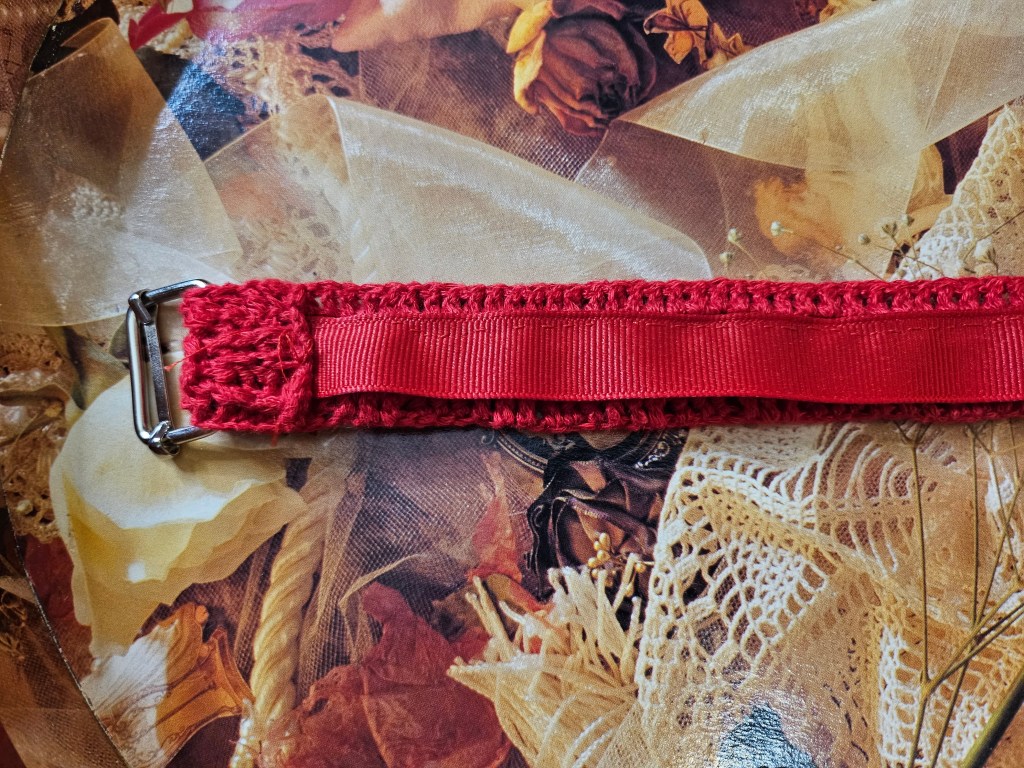
Step 3: Cut ribbon 1/4 an inch shorter than your belt, then pin it in place on the backside of the belt. Sew it in place.
Step 4: Fold one end of the belt around the belt buckle and sew it into place.
Okay, that’s the belt done! The bag isn’t quite as straightforward because you can make it in any number of ways. The one I made was just 2 circles I worked, then added a small edging to. What’s important when making the bag is to make sure you make the loop to slip it onto the belt. You can make it separately from the bag pieces, or you could attach it directly to one side of the bag like I did with mine:
You want this loop to be 1-1/4 inches so it’s easy to slide where you want it.
A few tips for making the bag:
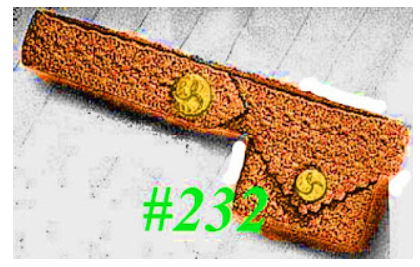
If you love a good motif, a bag belt is a great way to use them. Just make two that you like (here’s a whole book of them [not a sponsored link, just a book I use]).
Keep in mind that if you’re using an open work stitch for your bag, you’ll either need to line it so nothing small falls out or just not put small stuff in there.
Lining the bag no matter the stitch pattern would give it a bit more structure and make it easier to carry heavier items like your phone.
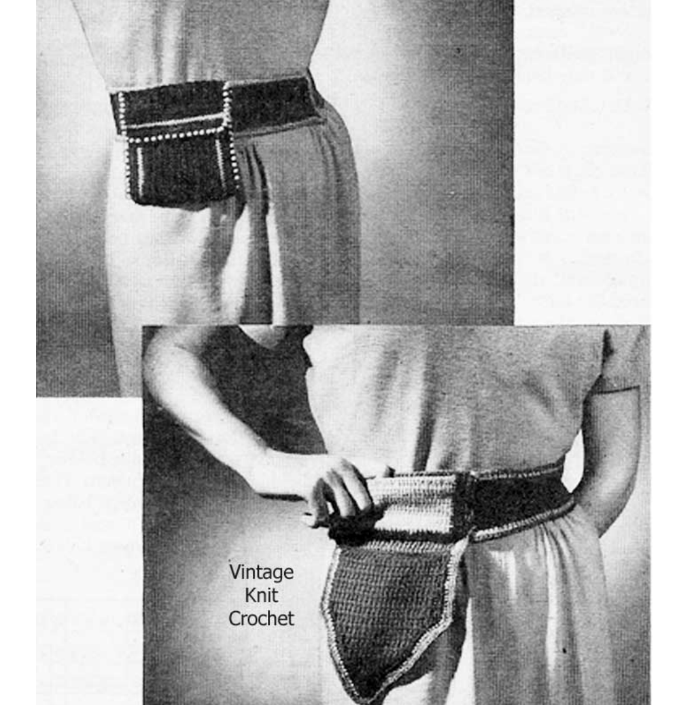
As always, just have fun! If you want to get your hands on some vintage belt bags, here’s a few links [again, not sponsored]:
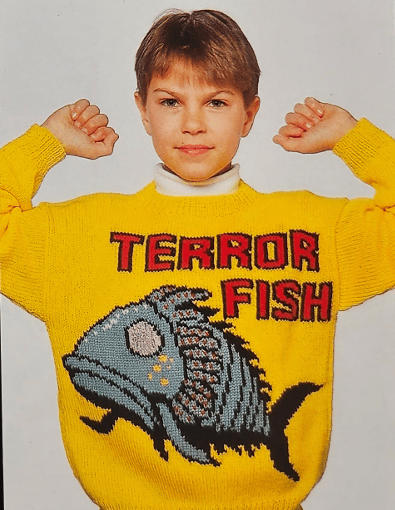
A few months ago, minding my own business while doing nothing important on tumblr, I came across this photo:
The comments under the photo were fantastic. People were psyched to see “the return of terror fish” and talked about how much they wished they had the pattern.
Now, yes, I only crochet and this is knit (intarsia knit, specifically), but I love a challenge, so I dug around for awhile. This amazing sweater was a design done by Gary Kennedy, a prolific designer in the 1980s and into the 1990s. He specialized in intarsia, and this design came from a booklet for a BBC show called Stingray. It was a puppet show by the same people who did Thunderbirds, and the Terror Fish was clearly a recurring character.
The great thing about intarsia knitting is that it very easily translates to crochet. Colorwork is colorwork, after all. While I’ve never seen Stingray, I like a good sweater, and that up there? That’s a GREAT sweater.
After several hours of searching, I came to realize that while the Stingray booklet is still available via etsy and ebay, no one had digitized it. As a fan of digital patterns in general, I did what had to be done: I bought the booklet from a UK seller and spent more than I care to say aloud for shipping to the US. It arrived as promptly as possible and in great condition.
In the 1970s, no one believed in this existence of hips. But the 1970s definitely believed in bikinis, and holy shit are there some cute options to crochet:
However, if you are like me and have the audacity to have a noticeable size difference between your waist and your ass, 1970s bikini bottom patterns look impossibly small.
But never fear! It’s actually pretty easy to size up to a size that’ll fit. Here’s how to do it:
Step 1: Get a good measurement on your hips.
You want the widest part of your hips, and you want it comfortable but snug. For this example, we’ll use my hip measurement, which is 44 inches.
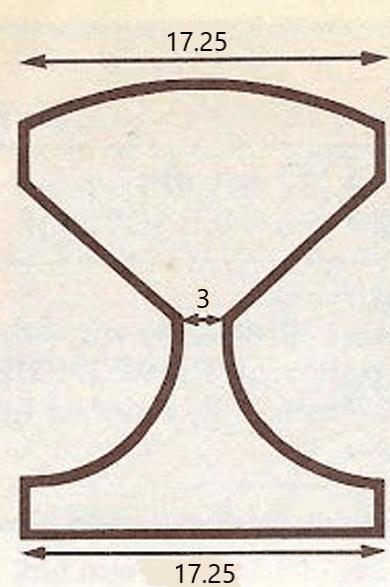
Step 2: Look at the measurements provided in the pattern.
They may just be written down, but you might have a schematic like this one:
The scratched out numbers were in centimeters; get that shit out of here rest of the world
This is showing the back, gusset (crotch), and front width of the bikini bottom. It’s the number at the back we’re most interested in, but we’ll need all three.
Step 3: Take your hip measurement, and subtract the front width.
As I said, we’ll use my hip measurement as a guide:
This tells me how many inches I need to work the back to at its widest point so that these bottoms will fit. As we can see, the back is also 17.25 inches wide. So, let’s subtract the leftover hip measurement to find out how much wider it needs to be:
26.75 (leftover hip measurement) – 17.25 = 9.5 inches
Got that. Let’s do some more math!
Step 4: Adding the extra stitches.
Now that I know I need another 9.5 inches added to the back of the bottoms so they’ll fit, I need to figure out WHERE to put those extra stiches. First off, I need to know my stitches per inch. Let’s say it’s 6. That’s a fairly common stitches per inch with these suits.
6 stitches per inch X 26.75 inches (total inches needed) = 160.5 stitches
Since this came out to a half-number, I’m going to round down to the nearest stitch, which is 160.
So, 160 stitches at the widest part of the back. Got it.
Step 5: Check how the bottoms are made.
Bottoms tend to be made in one of two ways: Either you make a single piece of fabric that you sew up the sides when complete, or you make a front and a back–one of which will include the gusset, and then sew them together at the end.
If the bottoms are worked in one piece from the front, you’ll start increases in the same place as the back increases start according to the pattern, you’ll just be adding more stitches.
If the bottoms are worked one piece from the back, you’ll start decreases in the same place as the back decreases towards the gusset, but you’ll be decreasing more stitches.
If the bottoms are worked in two pieces, you’ll either start at the bottom of the back and work upwards (increasing) or work from the top of the back downwards (decreasing).
The gusset measurement is important when you’re making the bottoms in one piece or when the gusset is attached to the back because you need that measurement to stay the same so the fit between the legs is correct. Always double check your gusset measurements carefully.
The trick to increasing or decreasing is putting those extra stitches where they’ll fit best. The increases and decreases on bathing suits tend to happen right on the edge of the leg hole, and as you’ll be working over the curve of your hips, it’s easy and usually doable to just add those increases or decreases next to the original ones.
However, if you need more than 2 or 3 stitches either way per row, find the center of the work and add or subtract stitches from there as well. This will help keep your legholes properly sized and also cause less curving right at the edges, which can get unruly.
Step 6: More math!
Okay, we know the number of stitches we need (160). We know how many stitches to an inch (6). We know how the bottoms are made. Now, how many rows are actually used to create the back of the bottoms, and of those rows, how many already include increases?
It’s possible you can work all of your increases into the rows you already have. If you have 20 rows to work, and each row gets two increases for the sizes in the pattern, and you know you need two more increases per row to get the width you need, just add those increases next to the others.
If you need noticeably more increases than the row calls for, space those increases out for a smoother look. If you need seven increases per row and the pattern only calls for two, you can do two on each end three in the center. This will get all your increases in without bunching a lot of stitches all together at the start.
The same goes for decreases.
Step 6 is really more suggestions than hard and fast explanation. It’s that way because a lot of how you add sizing in a pattern is determined by how the pattern does it in the first place. Where you can match what’s happening, do it. If you want to make the bottoms a little taller, work extra stitches into those rows as well. This is all just meant to give you a walkthrough of how to get started in making things fit.
Also, don’t be afraid to split your measurement over the front and the back if you want! I have more ass than belly, so it’s easiest for me to just add to the back where I’m curvier. If you have more belly than ass, flip the script and leave the back alone and add the extra stitches to the front. It’ll get you a more comfortable fit, most likely.
To begin a filet crochet project, you will need a chain that is a multiple of 3. For this shirt, work a chain until it is half the size of the widest part of your torso, then add stitches to make a multiple of 3 if needed.
To begin the filet pattern, skip 5 chains and DC in the next chain. Chain 2. *Skip 2 chains. DC in the next chain.* Repeat * across.
To start the second row and all other rows, chain 5 and skip the first DC and first 2 chains. DC in the next DC. *Ch 2. DC in the next DC.* Repeat * across.
Alternate row start: Ch 1. Complete an Extended Single Crochet (ESC) in the first DC. *Ch 2. DC in the next DC* Repeat * across.
To decrease: Fasten off last full row. Join yarn in a double crochet. Chain 5 (or complete an ESC and 2 chains). filet across, stopping the same distance from the end that you started from (for example, if you skipped 3 squares at the start, do not complete the last three squares at the far end).
Make the front and back the same.
Make sure the front, back, and sleeves all have the same number of decreases over the same number of rows. Above, 12 squares are removed in decreases over 2 rows. The same decrease pattern should be followed on all pieces.
For sleeves: Math! Make a chain wide enough to fit around your arm comfortably that is also a multiple of 3 (when it doubt, go up stitches to meet the multiple of 3). Divide that number by 3 to figure out how many squares you will make. You will need enough squares that the final number after decreasing will still fit over your shoulder while also matching the number of decreases made on the front and back.
To decrease sleeves: Do the same as to decrease the front and back.
Sew front and back together up to armhole. Match up decreased rows between the front, back, and sleeves. Sew into place.